Using and configuring the Scanner Event Buttons (Copy/Email/PDF/Scan to PC) (Windows and macOS)
- Windows 7, Windows 8, Windows 10
- macOS / Mac OS X
- Scanner Event Buttons
- Epson Scanner range
- Epson All-In-One products
The buttons on a scanner are normally referred to as 'dumb button' as when pressed all they do is generate a set signal, which the computer then responds to. These are generally termed Device Events, an 'event' that is initiated by a device but controlled by the computer.
The buttons on the scanner let you automatically open scanning software and scan your image to a program or file. The illustration below shows a scanner with four event buttons, however the number of buttons will vary depending on your scanner model. Some Epson All-In-One products have a 'push button' feature but have just one button. This function is supported when the Epson device is connected to a computer via a cable connection such as USB or FireWire.
Example of the Perfection V500 scanner buttons:
| a |  Scan to PDF button (Adobe Acrobat Reader) Scan to PDF button (Adobe Acrobat Reader) |
| b |  Scan (or Attach) to E-mail button Scan (or Attach) to E-mail button |
| c |  Copy button (EPSON Copy Utility) Copy button (EPSON Copy Utility) |
| d |  Start button (EPSON Scan) Start button (EPSON Scan) |
|
Additional options may be available, depending on the software you have installed on your system. Windows 7 users: Where available, we recommend downloading and installing the latest version of Epson Event Manager from the Epson support website. Windows 7 does not come with preinstalled email software such as Outlook Express. You will need to install email software to use the Scan to Email feature of the scanner/All-In-One. |
Scanners using EPSON Event Manager: Assigning a Project Program in Epson Event Manager to a Scanner Button
You can assign any of the scanner buttons to open a program in Epson Event Manager to make scanning your projects even quicker.
|
Windows 7 users: We recommend downloading and installing the latest version of Epson Event Manager from the Epson support website. Note: This is not required for the Stylus Photo PX710W and PX810FW models or models released after June 1st 2010. |
- Do one of the following:
Windows: Select the Start > Programs or All Programs > Epson Software > Event Manager.
Mac OS X: Select Applications > Epson Software, and double-click the Launch Event Manager icon.
- You see the Button Settings tab in Epson Event Manager. Click the arrow in the list next to the button name, then select the action you want to assign. For some models, you will need to select your scanner model first from the top-right corner.
- Click Close to close the Epson Event Manager window. Now whenever you press the button you assigned, the action you selected opens.
Windows users: When you wish to use the push-scan feature with Event Manager, make sure that the EPSON Event Manager icon is displayed in the notification area of the Windows taskbar/system tray.
- For further assistance, we recommend viewing the following Related Article: How do I configure the scanner button for Epson Event Manager?
- If you need help using Epson Event Manager, do one of the following:
- For Windows: Click the
 icon in the upper right corner of the screen.
 - For Mac OS X: Click Help, then Epson Event Manager Help.
- For Windows: Click the
 Note:
Note:If you are using one of the following network-capable All-In-Ones on a wired (Ethernet) or wireless network, you will need to make sure that the check box beside Enable Network Scan is ticked in the Network Scan Settings dialogue. This is located at the bottom of the Button Settings tab.
Applicable models include:
- Stylus Office BX305FW, BX310FN, BX320FW, BX525WD, BX535WD, BX610FW, BX625FWD, BX630FW, BX635FWD, BX925FWD, BX935FWD
- Stylus SX420W, SX425W, SX510W, SX515W, SX525WD, SX610FW, SX620FW
- Stylus Photo PX710W, PX720WD, PX730WD, PX810FW, PX820FWD, PX830FWD
You can also change the Network Scan Name if needed. We recommend setting a unique, recognisable name on each computer that will use the All-In-One e.g. 'MaryPC1', 'Computer1', 'Computer2'. Click OK and close the Button Settings window.
Scanners using EPSON Creativity Suite: Assigning a Project Program in the Epson Creativity Suite to a Scanner Button
You can assign any of the scanner buttons to open one of the Epson Creativity Suite project programs to make scanning your projects even quicker.
- Do one of the following:
Windows: Double-click the EPSON File Manager icon on your desktop. You see a window similar to the one below.
Mac OS X: Double-click the EPSON File Manager for X icon on your desktop. You see a window similar to the one below.
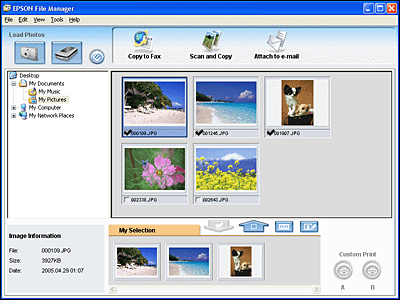
- Click the
 icon in Load Photos in the upper left corner of the window. You see this window.

- To assign a project program to the Start button, go to step 3.
- To assign a project program to one of the other buttons, go to step 4.
- Select the project program that you want to assign to the Start button and click OK. See the table below for guidance in selecting the correct project program. Then go to step 5.
Project program Action when the Start button is pressed Scan and Save Epson Scan starts. Scan and Copy The Copy Utility starts. Copy to Fax The Copy Utility starts. Scan to E-mail Epson Scan automatically scans, then the Send File Via E-mail window appears. Scan to PDF The Scan to PDF window appears. View Epson File Manager starts. Note:Additional options may be available, depending on the software you have installed on your system. This list includes only project programs that may have been bundled with your product.
- Click the Advanced Settings button to assign a project program to another button. The following window will open:
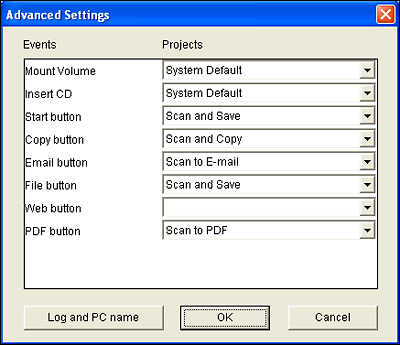
Click the arrow in the list next to the button name, then select the project program you want to assign from the drop-down menu that opens. (See the table above for details.) Click OK, then click Cancel to close the Start Button Settings window.
- Close Epson File Manager.
Now whenever you press the button you assigned, the project program you selected will open.
Assigning Another Windows Program to a Scanner Button
The way the computer responds to the command when a scanner button is pressed can be programmed on most Windows systems. You can program the scanner to open an Epson scanning program or a Windows TWAIN-compliant program.
|
Note for Macintosh users: On your Macintosh computer, you cannot assign any application other than EPSON Smart Panel or EPSON Creativity Suite (depending on the software your scanner uses) to the buttons on the scanner. |
- Open Printers & Scanners / Scanners & Cameras.
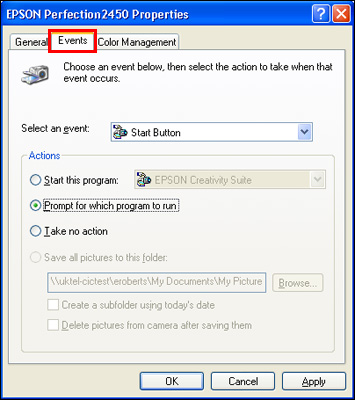
- Right-click on your scanner's icon and left-click on Properties. Then click on the Events tab.
Normally when a scanner button is pressed the selected program will open and initiate a scan. If more than one program has been selected on the Events tab then you will be prompted to select one of these programs from the dialogue box that appears. Only the programs that will support device events will be listed here. If a program is not listed then it cannot be associated with a scanner button.
- To program a button, follow the instruction for your version of Windows:
- Windows XP & Vista: In the Select an event list, choose the button to which you want to assign a program.
Note:
In Windows Vista, it may not be possible to open a specific program when a scanner button is pressed. Instead you may only receive a prompt which will allow you to select a suitable TWAIN-compliant program from a list.
In the Start this program list, choose the program you want to assign. Only compatible programs appear in the list. Click OK.
 Note:
Note:If you want to be given a choice of programs whenever you press the selected button, click the Prompt for which program to run button instead. If you want to disable the button from opening a program, click the Take no action button instead.
Note:If you want to be given a choice of programs whenever you press the selected button, select more than one program in the list. If you want to disable the button from opening a program, click the Disable device events button instead.
Click Apply, then click OK.
Note:You must restart your computer before using the newly assigned scanner buttons.
- Windows XP & Vista: In the Select an event list, choose the button to which you want to assign a program.
Pressing a Scanner Button Does Not Start the Correct Program
- Windows: Make sure your Windows system is set up for scanner events as follows:
- Windows XP: Click the Events tab in your scanner's Properties window and make sure Take no action is not selected. Also, make sure the desired button is selected in the Select an event list box, and Start this program is selected.
- Mac OS X: Make sure you did not install the scanner software in Classic mode or run it in Classic mode. Also make sure you are logged on as the user who installed the scanner software. Other users must first start EPSON Scanner Monitor in the Applications folder and then press a button to scan.
- After launching the ImageCapture application once, it fails to subsequently relaunch and the Scan button on the scanner stops working.
- Perfection V200 only: EPSON Scan freezes if launched when the scanner is in standby mode (either from using the Push Button function or started via an application).
- Smart Panel users: Make sure that the scanner driver (EPSON Scan or EPSON TWAIN) and the EPSON Smart Panel are installed correctly. For Mac OS X users (Power PC), you may need you to start in the Classic mode to use the Push Button function.
- EPSON Creativity Suite users: Make sure EPSON Scan and the EPSON Creativity Suite are installed correctly.
Click here for information on the supported email applications for EPSON Creativity Suite.